KibanaのDockerイメージを使用する際に利用できる環境変数
概要
公式のDockerイメージを利用してKibanaを利用しているとき、kibana.ymlをマウントしないでできる範囲ってどこなの? ということが気になったので、ちょっと調べてみた。
ポイントは、docker cmdに割り当たっている /usr/local/bin/kibana-dockerの中にありました。
指定できる環境変数
kibana-dockerの中には、以下の設定項目が用意されています。
kibana_vars=(
    console.enabled
    console.proxyConfig
    console.proxyFilter
    elasticsearch.customHeaders
    elasticsearch.hosts
    elasticsearch.logQueries
    elasticsearch.password
    elasticsearch.pingTimeout
    elasticsearch.preserveHost
    elasticsearch.requestHeadersWhitelist
    elasticsearch.requestTimeout
    elasticsearch.shardTimeout
    elasticsearch.sniffInterval
    elasticsearch.sniffOnConnectionFault
    elasticsearch.sniffOnStart
    elasticsearch.ssl.certificate
    elasticsearch.ssl.certificateAuthorities
    elasticsearch.ssl.key
    elasticsearch.ssl.keyPassphrase
    elasticsearch.ssl.verificationMode
    elasticsearch.startupTimeout
    elasticsearch.username
    i18n.locale
    kibana.defaultAppId
    kibana.index
    logging.dest
    logging.quiet
    logging.silent
    logging.useUTC
    logging.verbose
    map.includeElasticMapsService
    ops.interval
    path.data
    pid.file
    regionmap
    regionmap.includeElasticMapsService
    server.basePath
    server.customResponseHeaders
    server.defaultRoute
    server.host
    server.maxPayloadBytes
    server.name
    server.port
    server.rewriteBasePath
    server.ssl.cert
    server.ssl.certificate
    server.ssl.certificateAuthorities
    server.ssl.cipherSuites
    server.ssl.clientAuthentication
    server.customResponseHeaders
    server.ssl.enabled
    server.ssl.key
    server.ssl.keyPassphrase
    server.ssl.redirectHttpFromPort
    server.ssl.supportedProtocols
    server.xsrf.whitelist
    status.allowAnonymous
    status.v6ApiFormat
    tilemap.options.attribution
    tilemap.options.maxZoom
    tilemap.options.minZoom
    tilemap.options.subdomains
    tilemap.url
    timelion.enabled
    vega.enableExternalUrls
    xpack.apm.enabled
    xpack.apm.ui.enabled
    xpack.canvas.enabled
    xpack.graph.enabled
    xpack.grokdebugger.enabled
    xpack.infra.enabled
    xpack.infra.query.partitionFactor
    xpack.infra.query.partitionSize
    xpack.infra.sources.default.fields.container
    xpack.infra.sources.default.fields.host
    xpack.infra.sources.default.fields.message
    xpack.infra.sources.default.fields.pod
    xpack.infra.sources.default.fields.tiebreaker
    xpack.infra.sources.default.fields.timestamp
    xpack.infra.sources.default.logAlias
    xpack.infra.sources.default.metricAlias
    xpack.ml.enabled
    xpack.monitoring.elasticsearch.password
    xpack.monitoring.elasticsearch.pingTimeout
    xpack.monitoring.elasticsearch.hosts
    xpack.monitoring.elasticsearch.username
    xpack.monitoring.elasticsearch.ssl.certificateAuthorities
    xpack.monitoring.elasticsearch.ssl.verificationMode
    xpack.monitoring.enabled
    xpack.monitoring.kibana.collection.enabled
    xpack.monitoring.kibana.collection.interval
    xpack.monitoring.max_bucket_size
    xpack.monitoring.min_interval_seconds
    xpack.monitoring.node_resolver
    xpack.monitoring.report_stats
    xpack.monitoring.elasticsearch.pingTimeout
    xpack.monitoring.ui.container.elasticsearch.enabled
    xpack.monitoring.ui.container.logstash.enabled
    xpack.monitoring.ui.enabled
    xpack.reporting.capture.browser.chromium.disableSandbox
    xpack.reporting.capture.browser.chromium.proxy.enabled
    xpack.reporting.capture.browser.chromium.proxy.server
    xpack.reporting.capture.browser.chromium.proxy.bypass
    xpack.reporting.capture.browser.type
    xpack.reporting.capture.concurrency
    xpack.reporting.capture.loadDelay
    xpack.reporting.capture.settleTime
    xpack.reporting.capture.timeout
    xpack.reporting.csv.maxSizeBytes
    xpack.reporting.enabled
    xpack.reporting.encryptionKey
    xpack.reporting.index
    xpack.reporting.kibanaApp
    xpack.reporting.kibanaServer.hostname
    xpack.reporting.kibanaServer.port
    xpack.reporting.kibanaServer.protocol
    xpack.reporting.queue.indexInterval
    xpack.reporting.queue.pollInterval
    xpack.reporting.queue.timeout
    xpack.reporting.roles.allow
    xpack.searchprofiler.enabled
    xpack.security.authProviders
    xpack.security.cookieName
    xpack.security.enabled
    xpack.security.encryptionKey
    xpack.security.secureCookies
    xpack.security.sessionTimeout
    xpack.xpack_main.telemetry.enabled
)
また、冒頭にはこのように記述されています。
# Run Kibana, using environment variables to set longopts defining Kibana's
# configuration.
#
# eg. Setting the environment variable:
#
#       ELASTICSEARCH_STARTUPTIMEOUT=60
#
# will cause Kibana to be invoked with:
#
#       --elasticsearch.startupTimeout=60
つまり環境変数で指定するときは、大文字で、ピリオドを_にした文字列で指定すれば良いということになりますな。
たとえばKibanaの日本語化
なので、i18n.localeという設定項目であれば、環境変数は I18N_LOCALE=ja-JP とすれば良いということなりますね。
  kibana:
    image: docker.elastic.co/kibana/kibana:7.2.0
    container_name: kibana
    environment:
      - I18N_LOCALE=ja-JP
    ports:
      - 5601:5601
    depends_on:
      - elasticsearch
    links:
      - elasticsearch:elasticsearch
    networks:
      - esnet
おわりに
設定ファイルに書くのではなく、環境変数で渡すというのは最近よく言われるところです。
日本語化だけでなく、他にも多くの設定項目が環境変数で渡せるので、いろいろお試しを。
おまけ
VSCodeからdockerコンテナに接続して、中のファイルが直接開くことができる・・・いい時代になりました。 とはいえ、docker exec -it **** bashなどと入って、viでやる癖は当分抜けそうにありません。
Elastic App SearchをDockerで動かす
概要
6月26日にElastic Stack 7.2.0がリリースされました。
この記事の中で、「Elastic App Search セルフマネージド版をリリース: 今後はElastic Stackとしてリリース」という気になる文言がありました。
オンプレミス版のElastic App Seachはこれまでベータ版の扱いで、ベータ版の間は無償で使えるよということでしたが、 7.2のリリースが出ると同時に、「しかも無料でご利用いただけます。」とアナウンスがあり、無料で使えるようになりました。
しかし、環境構築に時間をかけたくない、機能の確認・検証にはなるべく時間をかけたくない、 何なら何度でも使い捨てできる環境を用意したいというのが人の情け。そんなときにDockerを使いたくなりますね。
そこで、今回はApp SearchをDockerで動かすときにやった手順を紹介します。
App Searchとは
ElasticsearchとKibanaを使うと、CPU使用率のメトリクス分析などはすぐにできますが、全文検索エンジンとして使おうと思うと、UIが心もとないです。
検索キーワードを入れるテキストボックスと、検索結果を表示する領域、絞り込みを表示するような領域を用意するだけでも大変です。
そんなあなたにApp Search。
検索のUXの部分をうまい具合に補ってくれるシロモノです。 それがElasticライセンスのBasicで使えるというのですから、試さない手はありませんね。
入手元
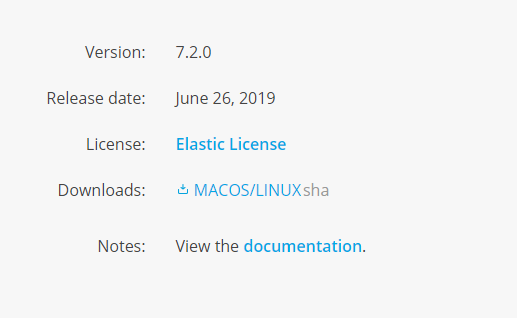
Elastic App Searchはここからダウンロードすることができます。
Download Elastic App Search | Elastic
現時点では、MacOSとLinuxのみとなっており、Windows用のバイナリは用意されていません。
Docker化しよう
検証環境や開発環境で既にDockerやk8sでElasticまわりを用意されている方も多いと思います。
ここから本題ですが、App SearchはDockerイメージが提供されていないようなので、自作してみましたよっと。
Dockerfile
まずはDockerfileを用意してローカルでイメージをビルドしましょう。
FROM openjdk:11-jdk

ENV APP_SEARCH_VERSION=7.2.0
ENV APP_SEARCH_FILE=app-search-${APP_SEARCH_VERSION}.tar.gz
ENV APP_SEARCH_DIR=/usr/share/app-search
ENV APP_SEARCH_USER=appsearch

RUN curl -s -O https://appsearch.elastic.co/downloads/appsearch/${APP_SEARCH_FILE} && \
    tar xvf ${APP_SEARCH_FILE} && \
    mv app-search-${APP_SEARCH_VERSION} ${APP_SEARCH_DIR} &&\
    useradd ${APP_SEARCH_USER} && \
    chmod +x ${APP_SEARCH_DIR}/bin/app-search && \
    chown -R ${APP_SEARCH_USER} ${APP_SEARCH_DIR}/

USER ${APP_SEARCH_USER}
WORKDIR ${APP_SEARCH_DIR}

EXPOSE 3002

CMD ["bin/app-search"]
app-search.ymlの準備
ここがDocker化するときの肝です。 いくつかポイントがあるので順に書いていきます。
標準のapp-search.ymlを取り出して下記を変更した上、保存しておきましょう。 コンテナ起動時に外から渡すときに使います。
elasticsearch.host
elasticsearch.host: http://elasticsearch:9200
デフォルトではコメントアウトされていますが、Elasticsearchが動いている場所を指定します。
未指定時はlocalhostになるので、コンテナで動かした場合、Elasticsearchへの通信が確立できずにApp Searchは起動に失敗します。
app_search.external_url
# * An IP: http://255.255.255.255
# * A FQDN: http://example.com
# * Shortname defined via /etc/hosts: http://app-search.search
app_search.external_url: http://*****.eastasia.cloudapp.azure.com
app_search.external_urlは、外からアクセスするときに使うIPアドレスやFQDNを指定します。
画面遷移が発生するときなど、このURLがもとにされます。
ポートのマッピングで3002:3002としてコンテナの外に晒しているのであれば、
app_search.external_url: http://*****.eastasia.cloudapp.azure.com:3002
のようにしてください。
listen_host , listen_port
App Searchは内部でjettyを使っています。そこでjettyが待ち受けするホストとポートを指定しておきましょう。
hostを0.0.0.0としているのは、コンテナの外から接続したいためです。
app_search.listen_host: 0.0.0.0 app_search.listen_port: 3002
lister_portはDockerfileでexposeで書いた3002と合わせておきます。
その他
マニュアルに記載されている内容として以下を追加
- allow_es_settings_modification: true
今回はelasticsearchはsslで繋がない環境なのでfalseに設定
- elasticsearch.ssl.enabled: false
注意点
app-search.ymlの中を見ておりますと、 app_searchという文字列があり、「-」なのか「_」で指定すべきなのか間違いやすいです。 うっかりミスにご注意を。
docker-compose.yml
確認用のdocker-composeファイルを用意します。
app-searchの3002番を80番にマッピングすること、app-search.ymlを外から渡しているところを見てください。
version: '2'
services:
  elasticsearch:
    image: docker.elastic.co/elasticsearch/elasticsearch:7.2.0
    container_name: elasticsearch
    environment:
      - cluster.name=docker-cluster
      - discovery.type=single-node
      - bootstrap.memory_lock=true
    ulimits:
      memlock:
        soft: -1
        hard: -1
    volumes:
      - esdata:/usr/share/elasticsearch/data
    ports:
      - 9200:9200
    networks:
      - esnet
  app-search:
     image: app-search:latest
     container_name: app-search
     environment:
       - ALLOW_ES_SETTINGS_MODIFICATION=true
     ports:
       - 80:3002
     volumes:
       - ./app-search.yml:/usr/share/app-search/config/app-search.yml
     depends_on:
       - elasticsearch
     links:
       - elasticsearch:elasticsearch
     networks:
       - esnet

volumes:
  esdata:
    driver: local

networks:
  esnet:
起動確認
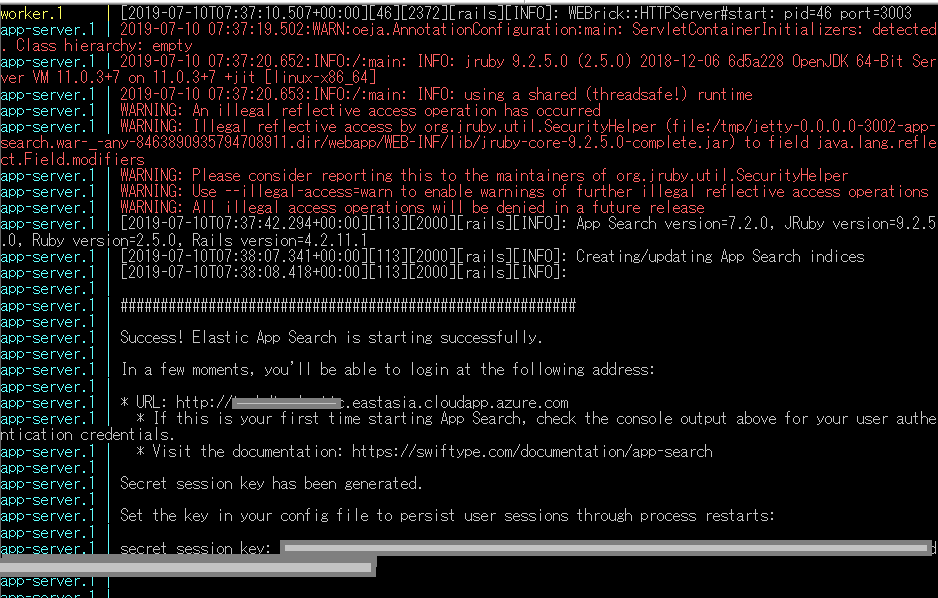
起動ログ
起動には時間がかかりますが、「Success! Elastic App Search is starting successfully.」と出るまで待ちましょう。
Welcome
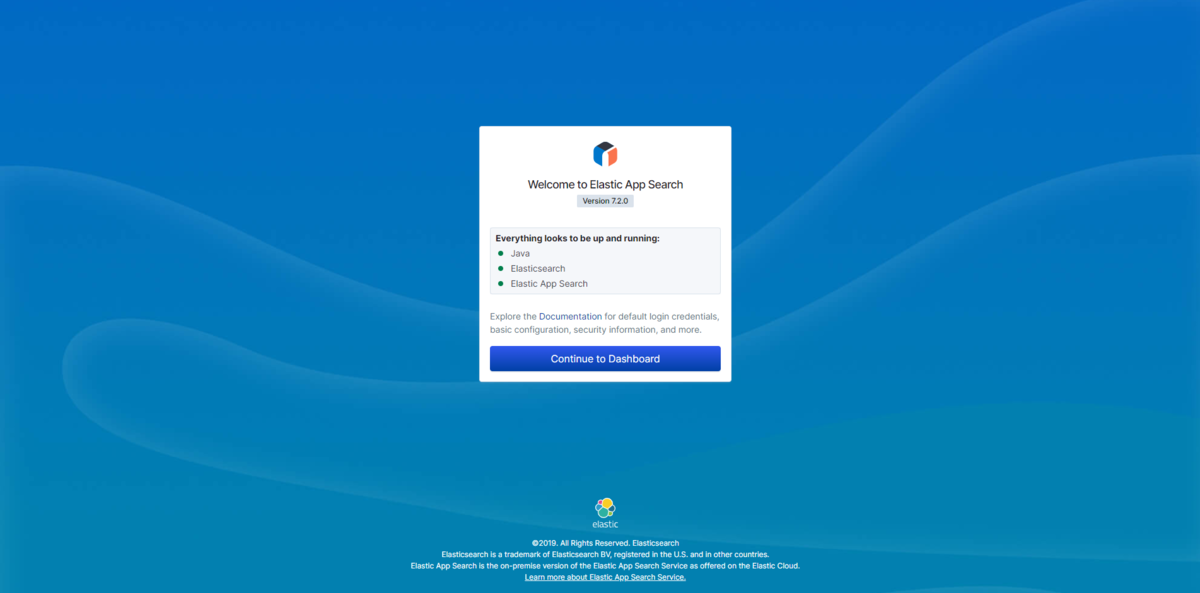
ログで起動が確認できたら、app_search.external_urlに書いたアドレスを入力して、画面にアクセスできることを確認します。
On Boarding 1
Engine名、言語を指定して、最初のApp SearchのEngineを作成する画面が表示されます。
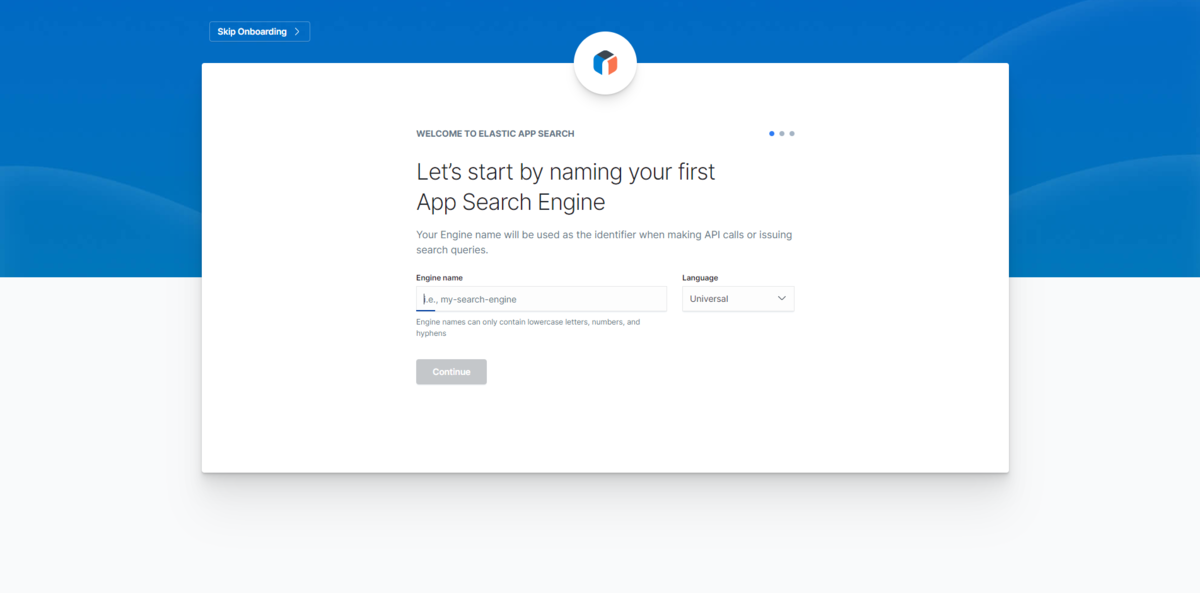
言語では日本語(Japanese)も選択可能ですので、日本語での検索を確認したい方はこちらを選択してから始めると良いかもしれません。
On Boarding 2
初回、ここで投入できるデータを持っていればデータを登録できます。
jsonファイルをアップするか、jsonを貼り付ける内容がサポートされています。
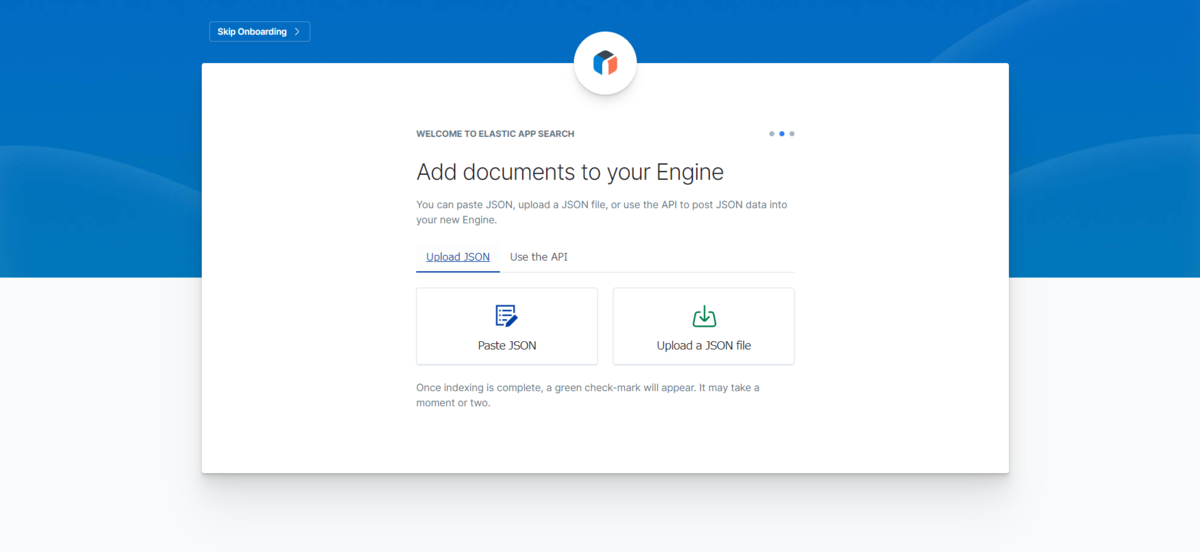
jsonを貼り付けを選択すると、テストデータがプリセットされています。そのまま次に進むとテストデータで作成が完了しますが、 自身でデータを貼り付けて、エラーが含まれているとこんな画面で教えてくれます。
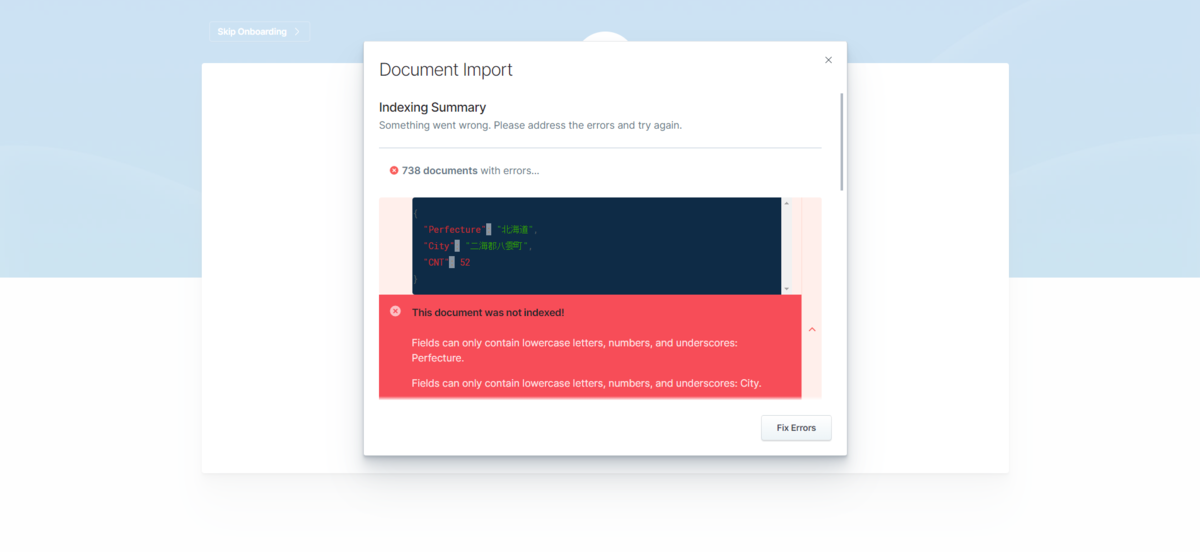
jsonのキー項目は小文字でお願いします、と。
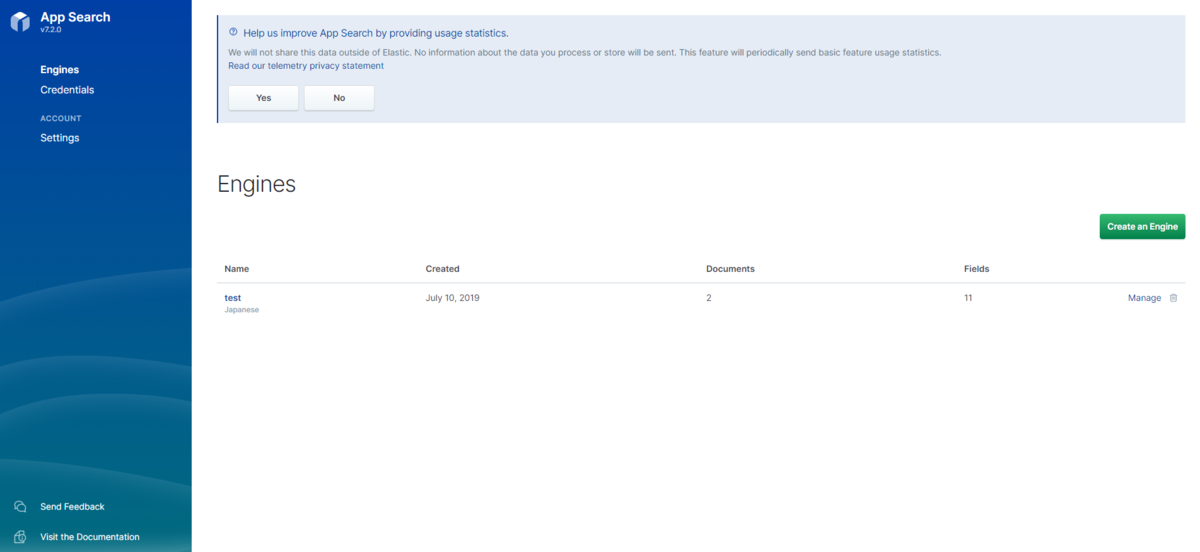
Dashboard
テストデータで登録すると2つのドキュメントが登録され、ダッシュボードの画面に遷移します。
終わりに
検索のUI/UXを自分で用意するのはつらい、そんな方はぜひ試してみると良いと思います。 Reactを知っていれば、カスタマイズの幅も広がり自由自在なUIが作れそうです。
Elastic StackをBasicライセンスのレベルでしか使っていない方でも、十分に恩恵に預かれるシロモノです。 Let's download now!
Elasticsearch 7.1.0 on DockerでSecurityを確認する
概要
Elasticsearch7.1.0では、BasicライセンスでSecurityの一部機能が無料で使えるようになったという記事が出ていました。
Security for Elasticsearch is now free | Elastic Blog
開発用、検証用と様々な用途で使われるDockerで簡易にこの内容を確認してみよう、というときのStep by Stepをメモ代わりに残します。
まじめに設定をymlに書く
これはDockerだろうが、オンプレだろうが変わらないですが公式ドキュメントに従って、手順を行います。
事前確認
上記のマニュアルでは、大事なことが書かれています。
Verify that the xpack.security.enabled setting is true on each node in your cluster. If you are using basic or trial licenses, the default value is false.
xpack.security,enabledをtrueにすると良いとありますが、Basicやトライアルライセンスではデフォルトはfalseですとあります。
つまり、何もせずにいたのではSecurityは有効になってないということです。
設定ファイルの変更
すべての設定項目は以下にありますが、認証をかけよう、ログインしないと使えないようにしたい、ということであれば、xpack.security.enabledをtrueにするだけです。
Security settings in Elasticsearch | Elasticsearch Reference [7.1] | Elastic
/usr/share/elasticsearch/config にある elasticsearch.ymlに設定を追加しましょう。
cluster.name: "docker-cluster"
network.host: 0.0.0.0
# 次の1行をadd
xpack.security.enabled: true
注意! xpack.security,enable: trueなどと誤った設定としてしまうと、コンテナが起動しなくなってしまいます。編集は慎重に。
パスワードの設定
デフォルトパスワードであるchangemeは、xpack.security.authc.accept_default_passwordがデフォルトでfalseとなっているため、自分でパスワードを設定することにしましょう。
/usr/share/elasticsearch/binにパスワード設定のコマンドがあります。
[root@3ad469374865 bin]# ./elasticsearch-setup-passwords -h
Sets the passwords for reserved users

Commands
--------
auto - Uses randomly generated passwords
interactive - Uses passwords entered by a user

Non-option arguments:
command

Option         Description
------         -----------
-h, --help     show help
-s, --silent   show minimal output
-v, --verbose  show verbose output
明示的に設定したいので、interactiveを指定することにします。
パスワードを入力、確認用でもう1回入力し、パスワードの変更を行います。
[root@3355edc468f8 bin]# ./elasticsearch-setup-passwords interactive
Initiating the setup of passwords for reserved users elastic,apm_system,kibana,logstash_system,beats_system,remote_monitoring_user.
You will be prompted to enter passwords as the process progresses.
Please confirm that you would like to continue [y/N]y


Enter password for [elastic]:
Reenter password for [elastic]:
Enter password for [apm_system]:
Reenter password for [apm_system]:
Enter password for [kibana]:
Reenter password for [kibana]:
Enter password for [logstash_system]:
Reenter password for [logstash_system]:
Enter password for [beats_system]:
Reenter password for [beats_system]:
Enter password for [remote_monitoring_user]:
Reenter password for [remote_monitoring_user]:
Changed password for user [apm_system]
Changed password for user [kibana]
Changed password for user [logstash_system]
Changed password for user [beats_system]
Changed password for user [remote_monitoring_user]
Changed password for user [elastic]
[root@3355edc468f8 bin]#
ここで設定したkibanaユーザのパスワードは、kibanaの設定のときに使うので覚えておきます。
ログイン画面が出ることを確認
http://xxx.xxx.xxx.xxx:9200/ にアクセスして、ログイン画面が表示されることを確認しましょう。

kibana用の設定ファイルも変更する
/usr/share/kibana/config/kibana.ymlにElasticsearchへの接続ユーザ、パスワードを設定しましょう。
SecurityはElasticsearchの方で有効にしているので、kibanaでは、接続ユーザ、パスワードの部分を設定します。
kibana.yml内で xpack.security.enabled: true とわざわざ書く必要はありません。
#
# ** THIS IS AN AUTO-GENERATED FILE **
#

# Default Kibana configuration for docker target
server.name: kibana
server.host: "0"
elasticsearch.hosts: [ "http://elasticsearch:9200" ]
xpack.monitoring.ui.container.elasticsearch.enabled: true


# この2行を追加する
elasticsearch.username: kibana
elasticsearch.password: 設定したパスワード
ファイルを保存して、コンテナを再起動しましょう。
kibanaのログイン画面
http://xxx.xxx.xx.xxx:5601/ にアクセスすると、ログイン画面が出るようになっています。

ここで指定するログインユーザは、kibanaユーザではなく、elasticユーザを指定します。kibanaユーザでログイン画面で入力すると、403エラーとなります。
{
statusCode: 403,
error: "Forbidden",
message: "Forbidden"
}
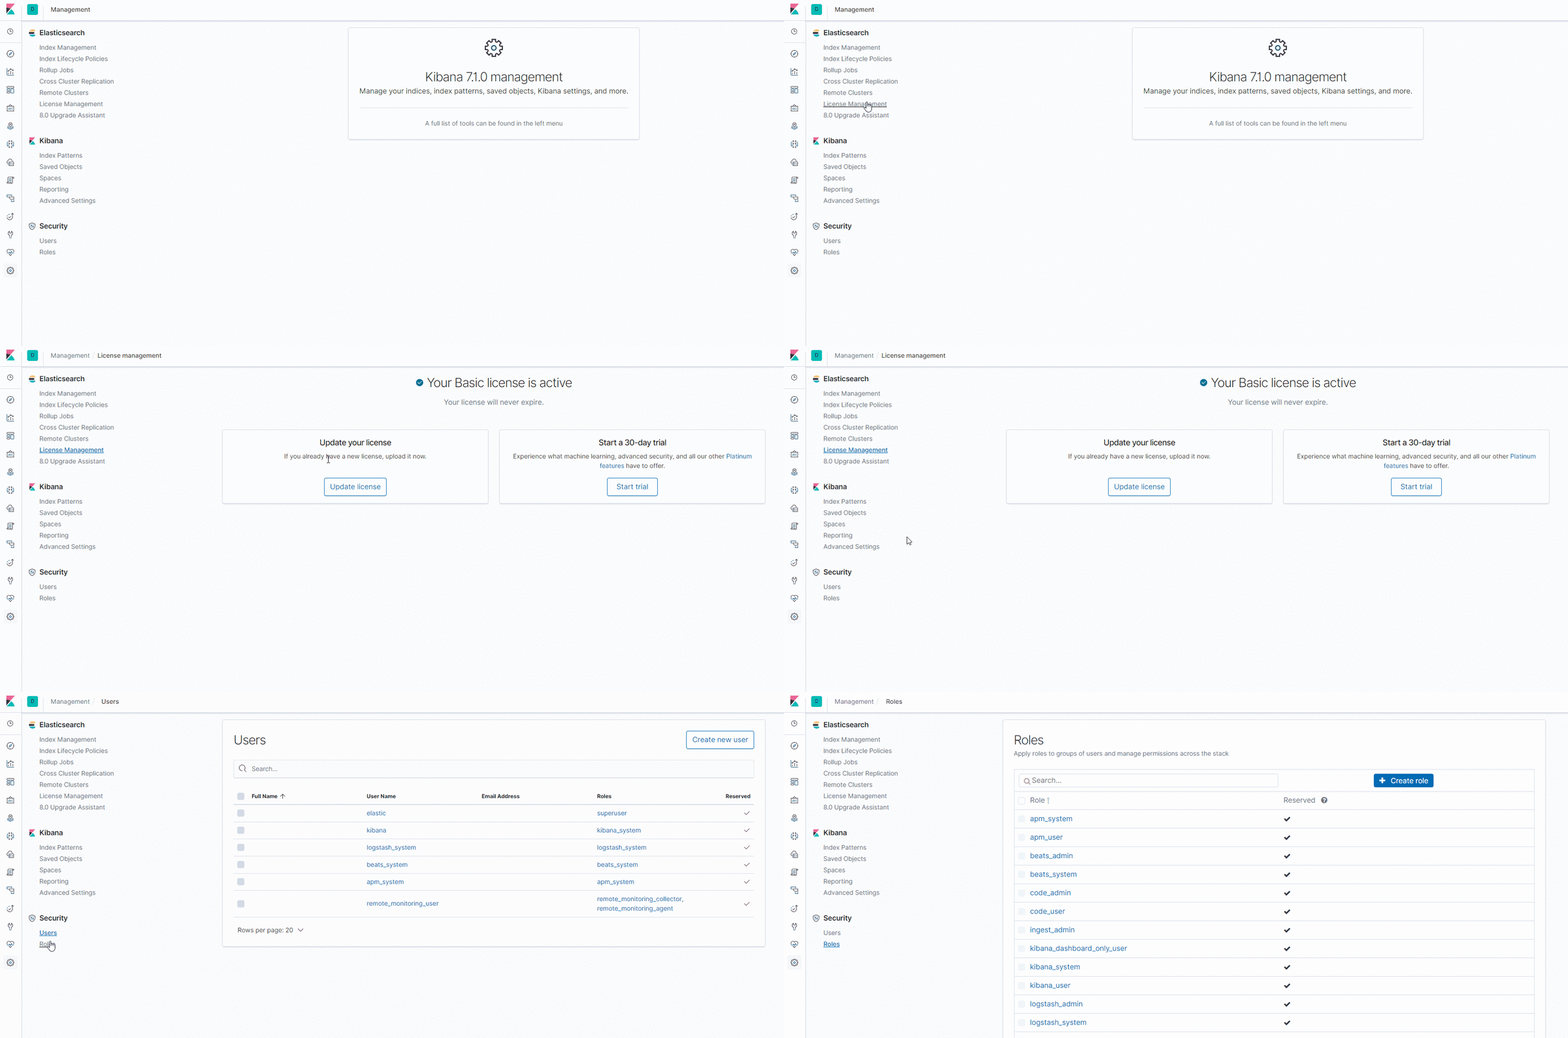
kibanaマネジメント画面で確認
Basicライセンスでセキュリティが使えるようになっていることをkibanaの管理画面から確認できます。
とりあえず動かしたい人向け
elasticsearch.ymlを変更するなど、dockerコンテナの中身を操作する必要があったり、volumeマウントでファイルを渡すのも手間だという人向けに、さらに手抜き方法です。
環境変数で指定する
たとえば、docker-composeの設定ファイルですが、環境変数を渡すことで設定ファイルに書かなくてもSecurityを有効にすることができます。
下の例では、Seruciryを有効にし、elasticユーザのパスワードをasdf1234に設定するものです。
Elasticsearchの部分だけでも認証ってどんなものかな? と動きを確認するぐらいの用途では使えるかと思います。
version: '2'
services:
  elasticsearch:
    image: docker.elastic.co/elasticsearch/elasticsearch:7.1.0
    container_name: elasticsearch
    environment:
      - cluster.name=docker-cluster
      - discovery.type=single-node
      - bootstrap.memory_lock=true
      # ↓ xpack.seruciry用の設定
      - ELASTIC_PASSWORD=asdf1234
      - xpack.security.enabled=true
    ulimits:
      memlock:
        soft: -1
        hard: -1
    ports:
      - 9200:9200
他にどんなものが設定できるのか? については、以下が参考になります。
      - ELASTIC_PASSWORD=$ELASTIC_PASSWORD
      - xpack.license.self_generated.type=trial
      - xpack.security.enabled=true
      - xpack.security.http.ssl.enabled=true
      - xpack.security.http.ssl.key=$CERTS_DIR/es01/es01.key
      - xpack.security.http.ssl.certificate_authorities=$CERTS_DIR/ca/ca.crt
      - xpack.security.http.ssl.certificate=$CERTS_DIR/es01/es01.crt
      - xpack.security.transport.ssl.enabled=true
      - xpack.security.transport.ssl.verification_mode=certificate
      - xpack.security.transport.ssl.certificate_authorities=$CERTS_DIR/ca/ca.crt
      - xpack.security.transport.ssl.certificate=$CERTS_DIR/es01/es01.crt
      - xpack.security.transport.ssl.key=$CERTS_DIR/es01/es01.key
おわりに
elasticsearchのコンテナ起動時に、環境変数でxpack.license.self_generated.type=trial をつけるだけで、トライアルが開始された状態で起動します。
機能の検証などを行う環境がすぐにできるという点ではうれしいですね。
もっとも、Elastic Cloudで小さいインスタンスを使うというのが一番確実な気もしますが・・・
今回はSecurityの機能部分について注目しましたが、今後もドキュメントやkibanaのUIの日本語化もこれからなされる予定だとかで今年も変更が多そうです。 今後のロードマップも気になるところですな。
折しも5月30日には今半弁当elastic{ON}があるので、参加したら何か情報を書きたいと思います。
Metricbeatに入ったMSSQLモジュール(ベータ版)を使おう
概要
本日、Elastic Stack 7.0のWebinarがありました。そこでBeatsシリーズとして、ModuleのところでMSSQLがチラッと紹介されていました。
最近では、APMの.NET Agentがベータ版として出てくるなど、Microsoft界隈の製品をお使いの方にもElasticがより身近になってきたように思います。
MSSQLモジュール
このモジュールを使うと、どんな可視化ができるようになるんでしょうか。
これを確認してみます。
大きくは2つのカテゴリのメトリクスを取得することができます。
- transaction_log
- performance
それぞれにVisualization、Dashboardがあるので、それを見ていきましょう。
標準で用意されるVisualization
標準で用意されているVisualizationのパーツがこちらです。
| Title | Type |
|---|---|
| Active size of transaction log [Metricbeat MSSQL] ECS | Visual Builder |
| Batch Requests/sec [Metricbeat MSSQL] ECS | Line |
| Buffer Cache Hit Ratio [Metricbeat MSSQL] ECS | Line |
| Database selector [Metricbeat MSSQL] ECS | Controls |
| Lock Waits/sec [Metricbeat MSSQL] ECS | Line |
| Log space size since last backup [Metricbeat MSSQL] ECS | Visual Builder |
| Percentage of used space of transaction log [Metricbeat MSSQL] ECS | Visual Builder |
| Recovery size of transaction log [Metricbeat MSSQL] ECS | Visual Builder |
| Total log space usage [Metricbeat MSSQL] ECS | Visual Builder |
| Transaction log size since last checkpoint [Metricbeat MSSQL] ECS | Visual Builder |
| Transactions [Metricbeat MSSQL] ECS | Line |
| Used space of transaction log [Metricbeat MSSQL] ECS | Visual Builder |
| User Connections [Metricbeat MSSQL] ECS | Line |

ダッシュボード
Performance
パフォーマンスに関するMetricのダッシュボードがこちら

APMと異なり、T-SQLごとのクエリ所要時間などが出るわけではないようです。
一方、キャッシュからヒットした率などはAPMでは取得できない内容なので、あわせて利用するのが良さそうです。
Transaction Log
トランザクションログに関するMetricのダッシュボードがこちら
こちらには、controlパーツがついています。 左上の方にあるプルダウンメニューから、絞り込みたいDBを選択したあと、「Apply changes」で、絞り込みを行うことができます。

Metricbeatの設定
この設定を足せばmetricbeatの設定ファイルに足せば良いのですが、それだけだと芸がないので私が困った点を追加しておきます。
#-------------------------------- Mssql Module --------------------------------
- module: mssql
  metricsets:
    - "transaction_log"
    - "performance"
  hosts: ["sqlserver://sa@localhost"]
  period: 10s
パスワードに@が入ってるんです
パスワードの複雑性要件などで、記号や大文字小文字、英数字の組み合わせを使ったパスワードをお使いの方もいらっしゃると思います。 もし、@をパスワードに使っていたら・・・どう書けばよいの?
たとえば、こうなります。 PASSWORD: P@ssw0rd の場合。
hosts: ["sqlserver://sa:P@ssw0rd@xxx.xxx.xxx.xxx"]
Microsoft Azure SQLDatabaseだったら
PaaSのSQL Serverの場合はどう書けるんですか、と。
通常は、Azure Monitorで見ることが多いと思いますが、もしMetricbeatでやるの場合は、どういう接続文字列にすれば良いんですか、という話です。
今回はSingle Databaseの構成で確認しています。
データべース指定しない版
hosts: ["sqlserver://ユーザ名:パスワード@*******.database.windows.net"]
Azureの管理画面の接続文字列のところにあるようにencrypt=true, TrustServerCertificate=falseのような設定をいれても、エラーにならず、Metricbeatは起動します。
hosts: ["sqlserver://ユーザ名:パスワード@*******.database.windows.net/?encrypt=true&TrustServerCertificate=false"]
この状態だと、システムデータベースのmasterを見てるので、あまりうれしくないですね。Single Databaseでたててるので、ユーザのたった1つのDatabaseの方を見て欲しいです。

データべースも指定する版
じゃあ、データベースも指定してみようということで、パラメータにdatabase=を追加します。
hosts: ["sqlserver://ユーザ名:パスワード@*******.database.windows.net/?database=データベース名&encrypt=true&TrustServerCertificate=false"]
起動時にエラーにはなりませんが、実際にElasticsearchに格納されたデータにはエラーとなっているデータがあります。
USEでデータベースを切り替えようとしてエラーになっているみたいです。
パフォーマンスの方のログは取れているようなので、このあたりは今後どうにかなるかもしれません。
error scanning single result: mssql: USE statement is not supported to switch between databases. Use a new connection to connect to a different database.

ダメな書き方
ホスト名/インスタンス名 と書くのが正しいですが、AzureのSQLDatabaseのインスタンス名って何?と、うっかりDatabase名などを書いてしまうと、こういうエラーになります。
ダメな例
hosts: ["sqlserver://ユーザ名:パスワード@*******.database.windows.net/HogeTest?encrypt=true&TrustServerCertificate=false"]
出てくるエラーがこちら。
could not create connection to db: error doing ping to db: Unable to get instances from Sql Server Browser on host *******.database.windows.net: read udp xx.xx.xx.xx:49413->zz.zz.zz.zz:1434: i/o timeout; could not create connection to db

終わりに
PaaSでDBを使っている人には、今一つ旨みがないかもしれません。 複数あるオンプレ環境でDBを立てていて、アプリケーションのログも、サーバ機のメトリクスも、DBとしてのメトリクスも1か所で統合してみたい! という用途に使えそうです。
クラウドも、オンプレもその差を意識せずにモニタリングできるようになると一番うれしいので、 mssqlのドキュメントでは、Microsoft SQL 2017と書いてあり、AzureもOKとは書いてないのですが、そのうち対応してくれると良いなぁ。
DockerのElasticsearchにSudachiをみっちり入れる
目的
前回は、SudachiをElasticsearchに入れるシンプルなやり方を紹介しました。
しかし、ダウンロードURLが変わったらどうすんの?バージョン文字列ならまだしも、いつ変わるか分からない文字列を持ちたくないです!という人もいらっしゃるでしょうし、 pom.xmlがあるんだから自分でビルドするがな! という奇特な方もいると思います。
今回はそんな方向けの情報です。
やること
必要な資源は3つなのは変わりません。
- Elasticsearch
- Sudachiの辞書
- elasticsearch-sudachiのプラグイン
ですが、これをSudachiに関しては、すべてGithubからソースを落としてきてビルドしましょう。
マルチステージで並列ビルドさせます。

辞書を生成するのと、elasticseaerch-sudachiプラグインは互いに独立した処理にできます。 辞書には、sudachiのjarが必要なので、sudachiのjarを作るところから入ります。
結論
Dockerファイルをあげておきましょう。
原本は以下に置いてあります。
https://github.com/tsgkdt/elasticsearch-sudachi-docker/blob/master/Dockerfile
# syntax = docker/dockerfile:1.0-experimental

ARG ELASTIC_VER=6.7.0
ARG ELASTIC_SUDACHI_VER=${ELASTIC_VER}-1.3.0
ARG SUDACHI_VER=0.2.1


######################################################################
# Sudachi本体のビルド. 辞書ビルドで、このjarが必要になる
######################################################################
FROM maven:3-jdk-8 as sudachi
RUN --mount=type=cache,target=/root/.m2 \
    git clone https://github.com/WorksApplications/Sudachi.git && \
    cd Sudachi && \
    mvn package -Dfile.encoding=UTF-8

######################################################################
# Sudachiの辞書をビルドする. ここは時間かかる
######################################################################
FROM maven:3-jdk-8 as sudachi-dic

# Heapを多めにとっておかないと、辞書をビルドするときOutOfMemoryに遭遇する
ENV MAVEN_OPTS=-Xmx4096m

ARG SUDACHI_VER

COPY --from=sudachi /Sudachi/target/sudachi-${SUDACHI_VER}-SNAPSHOT.jar /Sudachi/target/sudachi-${SUDACHI_VER}-SNAPSHOT.jar

RUN --mount=type=cache,target=/root/.m2 \
    curl -s https://packagecloud.io/install/repositories/github/git-lfs/script.deb.sh | bash && \
    apt-get install git-lfs && \
    git lfs install && \
    : "sudachiのjarファイルをmavenに登録する" && \
    mvn install:install-file \
    -Dfile=/Sudachi/target/sudachi-${SUDACHI_VER}-SNAPSHOT.jar \
    -DgroupId=com.worksap.nlp \
    -DartifactId=sudachi \
    -Dversion=${SUDACHI_VER}-SNAPSHOT \
    -Dpackaging=jar \
    -DgeneratePom=true && \
    : "辞書をCloneしてビルドする" && \
    git clone https://github.com/WorksApplications/SudachiDict.git && \
    cd SudachiDict && git pull origin develop && \
    sed -i -e "s/0.1.2-SNAPSHOT/${SUDACHI_VER}-SNAPSHOT/g" pom.xml && \
    sed -i -e 's#</dependencies>#<dependency><groupId>com.worksap.nlp</groupId><artifactId>jdartsclone</artifactId><version>1.0.1</version></dependency></dependencies>#g' pom.xml && \
    mvn package -Dmaven.test.skip=true -Dfile.encoding=UTF-8 && \
    mkdir -p /sudachi-dic && \
    mv ./target/*.dic /sudachi-dic/

######################################################################
# elsaticsearch-sudachiをビルドする
######################################################################
FROM maven:3-jdk-8 as sudachi-plugin

ARG ELASTIC_VER
ARG ELASTIC_SUDACHI_VER
ENV ELASTIC_SUDACHI_FILENAME=analysis-sudachi-elasticsearch${ELASTIC_SUDACHI_VER}-SNAPSHOT.zip
ENV ELASTIC_SUDACHI_URL=https://github.com/WorksApplications/elasticsearch-sudachi/releases/download/v${ELASTIC_SUDACHI_VER}/${ELASTIC_SUDACHI_FILENAME}

RUN --mount=type=cache,target=/root/.m2 \
    git clone https://github.com/WorksApplications/elasticsearch-sudachi.git && \
    cd elasticsearch-sudachi && \
    git checkout -b worktag refs/tags/v${ELASTIC_SUDACHI_VER} && \
     sed -i -e "s#<artifactId>analysis-sudachi-elasticsearch.*</artifactId>#<artifactId>analysis-sudachi-elasticsearch${ELASTIC_VER}</artifactId>#g" pom.xml && \
    mvn package -Dmaven.test.skip=true && \
    mv ./target/releases /sudachi-plugin/

######################################################################
# Sudachiプラグインを入れたElasticsearchのイメージをビルドする
######################################################################
FROM docker.elastic.co/elasticsearch/elasticsearch:${ELASTIC_VER}

COPY --chown=elasticsearch:root --from=sudachi-dic /sudachi-dic/*.dic ./config/sudachi/
COPY --chown=elasticsearch:root --from=sudachi-plugin /sudachi-plugin/*.zip /tmp/elasticsearch/plugins/

ARG ELASTIC_SUDACHI_VER
ARG ELASTIC_SUDACHI_FILENAME=analysis-sudachi-elasticsearch${ELASTIC_SUDACHI_VER}.zip

RUN  bin/elasticsearch-plugin install -v  file:///tmp/elasticsearch/plugins/${ELASTIC_SUDACHI_FILENAME}
注意点
DOCKER_BUILDKITを使ってます。
export DOCKER_BUILDKIT=1 でビルドします。
Dockerfileのポイント
Sudachi本体のビルド
######################################################################
# Sudachi本体のビルド. 辞書ビルドで、このjarが必要になる
######################################################################
FROM maven:3-jdk-8 as sudachi
RUN --mount=type=cache,target=/root/.m2 \
    git clone https://github.com/WorksApplications/Sudachi.git && \
    cd Sudachi && \
    mvn package -Dfile.encoding=UTF-8
ここは何もないですね。git cloneしてmavenでビルドするだけです。
Sudachiの辞書のビルド
######################################################################
# Sudachiの辞書をビルドする. ここは時間かかる
######################################################################
FROM maven:3-jdk-8 as sudachi-dic

# Heapを多めにとっておかないと、辞書をビルドするときOutOfMemoryに遭遇する
ENV MAVEN_OPTS=-Xmx4096m

ARG SUDACHI_VER

COPY --from=sudachi /Sudachi/target/sudachi-${SUDACHI_VER}-SNAPSHOT.jar /Sudachi/target/sudachi-${SUDACHI_VER}-SNAPSHOT.jar

RUN --mount=type=cache,target=/root/.m2 \
    curl -s https://packagecloud.io/install/repositories/github/git-lfs/script.deb.sh | bash && \
    apt-get install git-lfs && \
    git lfs install && \
    : "sudachiのjarファイルをmavenに登録する" && \
    mvn install:install-file \
    -Dfile=/Sudachi/target/sudachi-${SUDACHI_VER}-SNAPSHOT.jar \
    -DgroupId=com.worksap.nlp \
    -DartifactId=sudachi \
    -Dversion=${SUDACHI_VER}-SNAPSHOT \
    -Dpackaging=jar \
    -DgeneratePom=true && \
    : "辞書をCloneしてビルドする" && \
    git clone https://github.com/WorksApplications/SudachiDict.git && \
    cd SudachiDict && git pull origin develop && \
    sed -i -e "s/0.1.2-SNAPSHOT/${SUDACHI_VER}-SNAPSHOT/g" pom.xml && \
    sed -i -e 's#</dependencies>#<dependency><groupId>com.worksap.nlp</groupId><artifactId>jdartsclone</artifactId><version>1.0.1</version></dependency></dependencies>#g' pom.xml && \
    mvn package -Dmaven.test.skip=true -Dfile.encoding=UTF-8 && \
    mkdir -p /sudachi-dic && \
    mv ./target/*.dic /sudachi-dic/
先ほどビルドしたsudachiのjarを使うことにしましょう。
Sudachiの辞書は、 https://github.com/WorksApplications/SudachiDict にありますが、今のところdevelopブランチしかないです。
sudachiのバージョン問題
2019/04/09時点では、このdevelopブランチのpomファイルでは、0.1.2-SNAPSHOTを使うとありますが、この時点でのSudachi本体の方は、0.2.1-SNAPSHOTまで上がっています。
仕方ないのでsedでpomを書き換えます。
sed -i -e "s/0.1.2-SNAPSHOT/${SUDACHI_VER}-SNAPSHOT/g" pom.xml
jar足りない問題

標準のpomのまま続けてビルドしようとすると、NoClassDefFoundErrorに見舞われます。
足りないのは、jdartscloneです。これをdependenciesに足してやりましょう。
またまた無理やりsedでpomをかきかえます。
sed -i -e 's#</dependencies>#<dependency><groupId>com.worksap.nlp</groupId><artifactId>jdartsclone</artifactId><version>1.0.1</version></dependency></dependencies>#g' pom.xml
メモリ足りない問題

何も考えずにmvn packageを実行すると長い間またされた後に、OutOfMemoryで落ちるという悲劇が待っています。
多めにメモリを割り当てておきましょう。
# Heapを多めにとっておかないと、辞書をビルドするときOutOfMemoryに遭遇する
ENV MAVEN_OPTS=-Xmx4096m
elasticsearch-sudachiプラグインのビルド
######################################################################
# elsaticsearch-sudachiをビルドする
######################################################################
FROM maven:3-jdk-8 as sudachi-plugin

ARG ELASTIC_VER
ARG ELASTIC_SUDACHI_VER
ENV ELASTIC_SUDACHI_FILENAME=analysis-sudachi-elasticsearch${ELASTIC_SUDACHI_VER}-SNAPSHOT.zip
ENV ELASTIC_SUDACHI_URL=https://github.com/WorksApplications/elasticsearch-sudachi/releases/download/v${ELASTIC_SUDACHI_VER}/${ELASTIC_SUDACHI_FILENAME}

RUN --mount=type=cache,target=/root/.m2 \
    git clone https://github.com/WorksApplications/elasticsearch-sudachi.git && \
    cd elasticsearch-sudachi && \
    git checkout -b worktag refs/tags/v${ELASTIC_SUDACHI_VER} && \
     sed -i -e "s#<artifactId>analysis-sudachi-elasticsearch.*</artifactId>#<artifactId>analysis-sudachi-elasticsearch${ELASTIC_VER}</artifactId>#g" pom.xml && \
    mvn package -Dmaven.test.skip=true && \
    mv ./target/releases /sudachi-plugin/
https://github.com/WorksApplications/elasticsearch-sudachi
こちらの方は辞書とは異なり、リリースごとにタグが打たれています。 なので、ElasticsearchとSudachiのバージョンの組み合わせの環境が取得しやすいですね。
こんな感じで、指定バージョンのソースを取得しましょう。
git checkout -b worktag refs/tags/v${ELASTIC_SUDACHI_VER}
6.7.0なのに6.7.1になっていた件
v6.7.0-1.3.0をビルドしようとしていたところ、出力されたartifactを見るとv6.7.1-1.3.0になっていて困りました。
https://github.com/WorksApplications/elasticsearch-sudachi/blob/v6.7.0-1.3.0/pom.xml
<artifactId>analysis-sudachi-elasticsearch6.7</artifactId>
6.7までしか指定していないと、そのときの最新版を取ってしまうようです。 なので6.7.0しか世の中に存在しないときは良いんですが、6.7.1が出たら6.7.0の環境のつもりなのに6.7.1になってしまいます。
そうならないようにするためには、6.7で止めるのではなく最後のバージョンまで指定してやればよいです。
そこで、sed
sed -i -e "s#<artifactId>analysis-sudachi-elasticsearch.*</artifactId>#<artifactId>analysis-sudachi-elasticsearch${ELASTIC_VER}</artifactId>#g" pom.xml
Elasticsearchへ
######################################################################
# Sudachiプラグインを入れたElasticsearchのイメージをビルドする
######################################################################
FROM docker.elastic.co/elasticsearch/elasticsearch:${ELASTIC_VER}

COPY --chown=elasticsearch:root --from=sudachi-dic /sudachi-dic/*.dic ./config/sudachi/
COPY --chown=elasticsearch:root --from=sudachi-plugin /sudachi-plugin/*.zip /tmp/elasticsearch/plugins/

ARG ELASTIC_SUDACHI_VER
ARG ELASTIC_SUDACHI_FILENAME=analysis-sudachi-elasticsearch${ELASTIC_SUDACHI_VER}.zip

RUN  bin/elasticsearch-plugin install -v  file:///tmp/elasticsearch/plugins/${ELASTIC_SUDACHI_FILENAME}
事前のステージでビルドした成果物をもってきて、辞書をコピー、プラグインのインストールの2ステップをやって終わりです。 お疲れさまでした。
DockerのElasticsearchにSudachiを手っ取り早く入れる
概要
Elasticsearchの形態素解析にSudachiを使うといいらしい、という声を聞いた方は多いのではないでしょうか。
kuromojiよりもいいらしい、企業が辞書をメンテしているから良さそう、という評価だと思います。
一方、kuromojiは elasticsearch-plugin install analysis-kuromoji で簡単にインストールできるのに対し、Sudachiはそうなっていません。
今回はもっとも簡単に、Sudachiを入れた環境を起動させることを目指します。
必要になるもの
用意しなければならないものは、以下の3つです。
- Elasticsearch (当たり前)
- Sudachiの辞書
- Elasticsearchに入れるSudachiのプラグイン
これを入れたDockerイメージを作りましょう。 辞書を入れる、プラグインを入れる、ここの手順だけに特化します。
結論
ARG ELASTIC_VER=6.7.0
ARG SUDACHI_PLUGIN_VER=1.3.0


######################################################################
# Sudachiプラグインを入れたElasticsearchのイメージをビルドする
######################################################################
FROM docker.elastic.co/elasticsearch/elasticsearch:${ELASTIC_VER}

ARG ELASTIC_VER
ARG SUDACHI_PLUGIN_VER


RUN curl -OL https://object-storage.tyo2.conoha.io/v1/nc_2520839e1f9641b08211a5c85243124a/sudachi/sudachi-dictionary-20190308-core.zip && \
    curl -OL https://object-storage.tyo2.conoha.io/v1/nc_2520839e1f9641b08211a5c85243124a/sudachi/sudachi-dictionary-20190308-full.zip &&  \
    unzip -o -d config/sudachi -j  'sudachi-dictionary*.zip'  && \
    rm -f sudachi-dictionary*.zip && \
    bin/elasticsearch-plugin install https://github.com/WorksApplications/elasticsearch-sudachi/releases/download/v${ELASTIC_VER}-${SUDACHI_PLUGIN_VER}/analysis-sudachi-elasticsearch${ELASTIC_VER}-${SUDACHI_PLUGIN_VER}.zip
あとは自身の環境でこのDockerイメージをビルドすれば、はい出来上がりです。
ポイント1
ElasticsearchのSudachiプラグインのインストールについて
公式のマニュアルには、こう書いてあります。
GitHub - WorksApplications/elasticsearch-sudachi: The Japanese analysis plugin for elasticsearch
- Download analysis-sudachi-elasticsearch zip archive file
- Move current dir to $ES_HOME
- Execute "bin/elasticsearch-plugin install file:///"
- Download sudachi dictionary archive from https://github.com/WorksApplications/SudachiDict
- Extract dic file and place it to config/sudachi_tokenizer/system_core.dic
- Execute "bin/elasticsearch"
いったんダウンロードし、そのファイルを使いましょうということですが、この手順が面倒なので、Githubのリリースタブから対象のzipを見つけて、そのURLを指定する形がもっとも簡単かと思います。
つまり、こうなります。
bin/elasticsearch-plugin install https://github.com/WorksApplications/elasticsearch-sudachi/releases/download/v6.7.0-1.3.0/analysis-sudachi-elasticsearch6.7.0-1.3.0.zip
ポイント2
辞書は2種類、coreとfullとついたものがあります。
GitHub - WorksApplications/SudachiDict: A lexicon for Sudachi
Latest Versionのところにビルド済みのzipになった辞書があがっているので、これを利用するのが手っ取り早いです。
起動して確認
プラグインの確認

動作の確認
analyze APIを実行してSudachiが実行されているかを確認します。

次回は
今回は既にビルドされたものを使った形でした。
ソースからビルドしようという猛者もいるでしょうから、次回はその内容を書く予定です。
Sphinxで作成するドキュメントをElasticsearchに入れる
概要
Sphinxとは!
Sphinxは知的で美しいドキュメントを簡単に作れるようにするツールです。Georg Brandlによって開発され、BSDライセンスのもとで公開されています。
このツールはもともと、the Python ドキュメントのために作られました、今では幅広い言語のプロジェクトでドキュメント作成を容易にするツールとして利用されています
そんなツールで生成されたドキュメントは、Read the docでたくさん公開されています。
ElasticsearchとなじみのあるところのFSCrawlerも、Sphinxを使って書かれています。
今回紹介するツール
何をするもの?
Indexes a documentation project build via Sphinx into elasticsearch. This is a stand-alone extraction of the functionality used by readthedocs.org, compatible with elasticsearch-6.
Sphinxのrst形式で書かれたドキュメントを、ビルドしてElasticsearchに格納するスタンドアロンのツールです!
何がうれしいの?
出来上がったHTMLやPDFファイルをクロールして、Apache Tikaを使って処理したり、Ingest Nodeで処理することなく、コマンド1行でElasticsearchに入れられる、ということでしょうか。
社内のイントラネットでドキュメントを公開している、CI/CDでドキュメントの作成、公開はできている、そこにElasticsearchにデータを投入する、というのも付け加えたい、という人には良さそうです。
他のクローラを使った場合ですと、ドキュメントの生成から、検索用インデックスの更新までのタイムラグが発生したりしますが、こうしたツールの場合はSphinxのビルドの直後にコマンドを走らせるだけなので、そういった心配ごとが少し低減されますね。
ツールのポイントはどこ?
これはツールの、というよりはSphinxの機能、といった方が正確でしょう。
出来上がったHTMLやPDFなど、何らかの抽出が必要なファイル形式にしてしまうと、Elasticsearchに格納するときに何らかのテキスト抽出処理が必要となります。
一方、reStructured Text形式のままだと、構造化されてはいるもののElasticsearchでフィールドに格納するには不便です。
例えば、下のテキストから「システム共通設計」をtitleフィールドに、というパースのルールを自分で書きたくないですね。
==============================================================================================================
システム共通設計
==============================================================================================================


はじめに
==============================================================================================================

本項の内容について
--------------------------------------------------------------------------------------------------------------

本書はパッケージ商品の要件定義書・設計書であるため、SIにおける具体的なユーザ要求やその対応方法の記述は行わず、その指針について示す。

本項では、システム全体の品質という観点で、非機能要求について以下のとおり整理を行う。
今回一番のポイントは、json形式でreStructured Textをビルドするところです。
Build your project as JSON (for easier parsing): bin/sphinx-build -b json . json-build
PDFやePubでの出力形式は試された方は多いと思うのですが、恥かしながらjson形式で出した後の使い道を、今回初めて体感しました。 json形式で平文の、かつElasticesearchのフィールドに入れやすい形式にしておく、というのがポイントでしょう。
json形式でビルドする
sphinx-buildでjson形式を指定して出力すると、拡張子がfjsonのものがビルドフォルダに作成されます。 中身を見てみると、bodyのところが非常に長く、改行されていないので見づらいですが、こんな感じです。
{
    "display_toc": true,
    "prev": {
        "link": "../",
        "title": "\u76ee\u6b21"
    },
    "sidebars": [
        "globaltoc.html",
        "relations.html"
    ],
    "current_page_name": "system_common_design",
    "sourcename": "system_common_design.rst.txt",
    "meta": {},
    "customsidebar": null,
    "page_source_suffix": ".rst",
    "metatags": "",
    "body": "すんごく長いので省略",
    "title": "\u30b7\u30b9\u30c6\u30e0\u5171\u901a\u8a2d\u8a08",
    "alabaster_version": "0.7.11"
}
Elasticsearchに投入
必要となる最小のパラメータは以下の通りです。
- Elasticsearchの場所を示すURL
- プロジェクト名
- 投入先のIndex名
- fjonが入ったSphinxでビルドしたフォルダ
これを以下のコマンドで投入します。
sphinx-elasticsearch index --es-url=http://xxx.xxx.xxx.xxx:9200 --project-name estest --index=docs0303 json_build
PyPIでの表示を見ると、--project-nameは必要なさそうに見えますが、必須パラメータになっていました。
Index into ES: bin/sphinx-elasticsearch index --es-url=http://localhost:9200 --index=docs json-build (If you pass --commit any previously indexed pages that have been deleted will be removed automatically.)
投入後の確認
titlteにタイトルが、contentにbodyの内容が、projectにコマンド引数で指定した--project-nameの値が入っていることが確認できました。

SphinxとElasticsearchのマッピングについては、こう説明されています。
Elasticsearch Mapping
| 項目 | 説明 |
|---|---|
| project | Short name of the project. Clients will use this to construct URLs. |
| path | Relative path of the page, without extension. |
| id | Unique identifier (hash of project and path) |
| commit | Optional, to allow deleting deleted pages on subsequent index runs. |
| title | Title of the page |
| headers | List of all headers on the page |
| content | Body of the page (any HTML markup is stripped by ES) |
Mappingはどう設定されているのか
SphinxとElasticsearch間の項目のマッピングは分かった、と。 では、ElasticseaerchのIndexのMappingについてはどうなんだ? と気になりますね。

見事なまでに全部keywordです。
よくPyPIでの説明を見ると、このように書いてありました。
Note that you’ll probably be better off managing index creation and mapping setup yourself; these two setup commands are more for getting started quickly and out of the box.
インデックスやマッピングの作成は自分でやれ、と。 確かにIndex Templateを使うとか、事前の準備をしておくだけで、このあたりの問題はクリアできそうです。
sphinx-elasticsearch自身にも、そのあたりのことを行うコマンドは用意されているようですが、 使い慣れたKibanaのDev Toolsでササッと作ってしまうほうが早いかもしれません。

おわりに
Elasticsearch自体が盛り上がってくると、周りの関連ツールも増えてきますね。 Apache Tikaでないパーサーを使ったファイルのクローラーを作った会社も岩本町あたりにあるとか聞きます。 MSOfficeにあるオートシェイプ内のテキストボックスの文字列なども取れるらしいです。
いろんなデータをどうやって入れるか、特にファイルサーバで苦労してきた身としては、そのあたりに役立ちそうな話を今後も追っていきたいと思いマッスルスーツ。
